1 페이팔 api(sandbox) 생성
1) 페이팔 회원가입
- 페이팔에서 개발자 계정으로 회원가입을 한다.
https://developer.paypal.com/docs/api-basics/manage-apps/#create-or-edit-sandbox-and-live-apps
Manage your apps
Manage your apps Learn how to create and manage REST API apps APICurrent The purpose of a REST API app is to generate your OAuth 2.0 credentials for the sandbox and live environments. Notes: To show your live app information, toggle to Live. To go live, se
developer.paypal.com
- 페이팔 Sandbox api는 테스트용이며 결제가 이뤄지지 않는다.
- Live api는 실제 런칭할 때 사용하며, 비즈니스 거래가 실제로 발생한다.
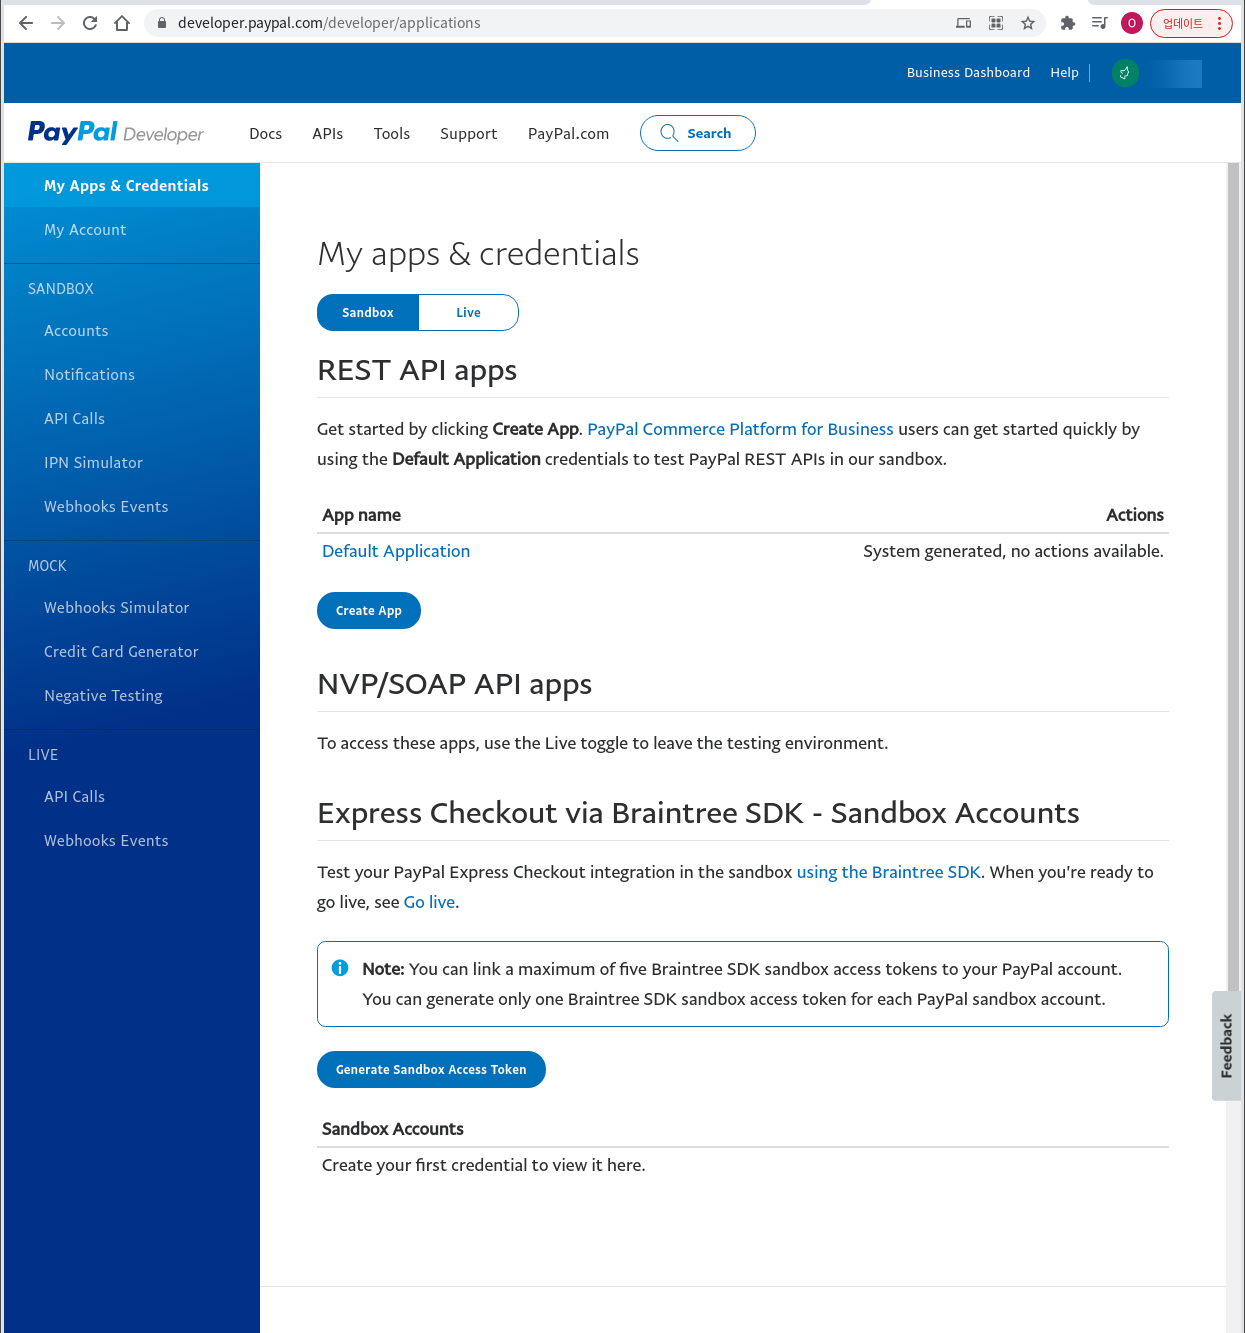

- 개발자 계정으로 로그인을 한 뒤에 아래 주소에서 api를 생성한다.(create App클릭)
https://developer.paypal.com/developer/applications
Applications - PayPal Developer
Log in to the Dashboard to create, edit, and manage PayPal apps. PayPal apps give you sandbox and live credentials that you use to make API calls, build, and test integrations. Non-U.S. developers: read our FAQ.
developer.paypal.com
화면에 따라 정보를 입력하다보면 샌드박스 api(가상결제)가 생성된다.

- 생성된 ID를 복사한다.

2) .env 추가
- .env파일에 페이팔 클라이언트 샌드박스 ID를 저장한다.
|
MONGODB_URL=mongodb://localhost/blogtest_db
JWT_SECRET=somethingsecret PAYPAL_CLIENT_ID=Ac9DDnFbiDFBdfDFEf4dfeDFHQ5eeFFD1F32FDFHTTTlZE7 |
[ root\.env ]
3) config.js 추가
- 전역으로 사용할 환경변수를 등록한다.
|
import dotenv from 'dotenv'; dotenv.config();
export default{
MONGODB_URL: process.env.MONGODB_URL,
JWT_SECRET: process.env.JWT_SECRET,
PAYPAL_CLIENT_ID: process.env.PAYPAL_CLIENT_ID, // 추가
}
|
[ root\backend\config.js ]
4) server.js 추가
- paypal 라우터를 추가한다.
|
// 중략...
app.use(cors());
app.use(bodyParser.json());
app.use('/api/users', userRouter );
app.use('/api/orders', orderRouter );
// <-- 추가 app.get('/api/paypal/clientId', (req, res) =>{
res.send({ clientId: config.PAYPAL_CLIENT_ID })
})
// 추가 --> app.get('/api/products', (req, res) => {
res.send(data.products);
});
|
[ root\backend\server.js ]
5) api.js 추가
- 페이팔 키를 받는 api를 추가한다.
|
export const getOrder = async(id) => {
// 중략...
}
// <-- 추가 export const getPaypalClientId = async() => {
const response = await axios({
url: `${apiUrl}/api/paypal/clientId`,
headers: {
'Content-Type': 'application/json'
},
});
if(response.status.Text !== 'OK'){
throw new Error(response.data.message);
}
return response.data.clientId;
}
// 추가 --> |
[ root\frontend\src\api.js ]
6) OrderScreen.js 추가
- 페이팔과 연결되는 모듈, 클라이언트 ID를 받는 모듈을 추가한다.
- 아래 코드에서 페이팔과 관련된 메서드는 checkout.js 페이팔 라이브러리 페이지에서 확인할 수 있다.
https://developer.paypal.com/docs/archive/checkout/integrate/?mark=get%20the%20code
PayPal Checkout Integration Guide
PayPal Checkout Integration Guide DocsDeprecated Important: PayPal supports these Checkout integrations: Smart Payment Buttons, which use the PayPal JavaScript SDK. Valid from February 2019 for new integrations. Checkout with checkout.js. Valid before Febr
developer.paypal.com
|
import { hideLoading, rerender, showLoading, showMessage, parseRequestUrl } from '../utils'; // 추가 import { getOrder, getPaypalClientId } from '../api'; // 추가
const addPaypalSdk = async(totalPrice) => { // <-- 추가
const clientId = await getPaypalClientId();
showLoading();
if(!window.paypal){
const script = document.createElement('script');
script.type = 'text/javascript';
script.async = true;
script.onload = () => handlePayment(clientId, totalPrice);
document.body.appendChild(script);
}else{
handlePayment(clientId, totalPrice);
}
}
const handlePayment = (clientId, totalPrice) => {
window.paypal.Button.render({
env: 'sandbox',
client: {
sandbox: clientId,
production: '',
},
locale: 'ko_KR',
style: {
size: 'responsive',
color: 'gold',
shpe: 'pill',
},
commit: true,
payment: (data, actions) => {
return actions.payment.create({
transactions:[
{
amount:{
total: totalPrice,
currency: 'USD'
}
}
]
})
},
onAuthorize: (data, actions) => {
return actions.payment.execute().then( async() => {
showLoading();
hideLoading();
showMessage('Payment was successful', () => {
rerender(OrderScreen);
})
})
}
}, '#paypal-button').then( () => {
hideLoading();
});
}
// 추가 --> const OrderScreen = {
after_render:async() => {},
render:async() => {
const request = parseRequestUrl();
const {
_id,
shipping,
payment,
orderItems,
itemsPrice,
shippingPrice,
taxPrice,
totalPrice,
isDelivered,
deliveredAt,
isPaid,
paidAt,
} = await getOrder(request.id);
// <-- 추가 if(!isPaid){
addPaypalSdk(totalPrice);
}
// 추가 --> return `
// 중략
},
};
export default OrderScreen;
|
[ root\frontend\src\OrderScreen.js ]
- 참고사항으로 위와 다르게 integration버전에서는 아래와 같이 구현할 수 있다.
https://developer.paypal.com/docs/business/javascript-sdk/javascript-sdk-reference/
Integrate Checkout
Integrate Checkout Integrate PayPal Checkout for online payments SDKCurrentStandardLast updated: October 29th 2021, @ 6:29:06 am Know before you code This integration sets up online payment options using the PayPal JavaScript SDK, which presents relevant p
developer.paypal.com
- 여기까지 진행한 뒤에 실행한다면, 실제로 결제가 이뤄지지 않지만 페이팔 버튼이 생성된 화면을 확인할 수 있다.

2 페이팔 SandBox 결제
1) OrderScreen.js 추가
- onAuthorize( )메서드는 페이팔에서 승인이 이뤄지고 난 이후의 구현을 담당한다.
|
onAuthorize: (data, actions) => { return actions.payment.execute().then( async() => {
showLoading();
// <-- 추가 await payOrder(parseRequestUrl().id, {
orderID: data.orderID,
payerID: data.payerID,
paymentID: data.paymentID,
})
// 추가 --> hideLoading();
showMessage('Payment was successful', () => {
rerender(OrderScreen);
})
})
}
}, '#paypal-button').then( () => {
hideLoading();
});
|
[ root\frontend\src\screens\OrderScreen.js ]
2) api.js 수정
- 페이팔에서 결제가 정상적으로 이뤄진다면, 해당 반환값(결제 정보)을 플랫폼 서버에 저장해둬야 한다. api.js에서 payOrder( )함수는 axios를 통해 PUT방식으로 서버를 업데이트한다.
|
export const getPaypalClientId = async() => {
// 중략...
}
// <-- 추가
try{
const { token } = getUserInfo();
const response = await axios({
url: `${apiUrl}/api/orders/${orderId}/pay`,
method: 'PUT',
headers: {
'Content-Type': 'application/json',
Authorization: `Bearer ${token}`,
},
data: paymentResult,
});
if(response.statusText !== 'OK'){
throw new Error(response.data.message);
}
return response.data;
}catch(err){
return { error:err.response ? err.response.data.message : err.message };
}
}
// 추가--> |
[ root\frontend\src\api.js ]
3) orderRouter.js 추가
- api.js의 payOrder( )는 PUT방식으로 'localhost:5000/api/orders/[params.id]/pay'경로에 페이팔 결제 정보를 보낸다. orderRouter.js는 payOrder( )가 보낸 데이터를 서버에 저장한다.
- 아래 코드에서 payerID, paymentID, orderID 3가지 속성이 페이팔에서 보낸 결제승인 정보에 해당되며, 사용자가 페이팔 ID를 변경하지 않는이상 payerID는 변하지 않는다. 나머지 2가지 속성은 결제마다 변경된다.
|
// <-- 추가 orderRouter.put( '/:id/pay',
isAuth,
expressAsyncHandler( async(req, res) => {
const order = await Order.findById(req.params.id);
if(order){
order.isPaid = true;
order.paidAt = Date.now();
order.payment.paymentResult = {
payerID: req.body.payerID,
paymentID: req.body.paymentID,
orderID: req.body.orderID,
};
const updatedOrder = await order.save();
res.send({message: 'Order Paid', order: updatedOrder });
}else{
res.status(404).send({ message: 'Order Not Found'})
}
})
);
export default orderRouter;
|
[ root\backend\routers\orderRouter.js ]
4) sandbox결제 테스트
- 페이팔 결제버튼을 클릭했을 때, 가상으로 결제가 진행된다. 그런데 페이팔 계정에 접속했음에도 아래와 같은 오류가 계속 뜨는 경우가 발생할 수 있다.

- 페이팔은 결제 테스트를 위한 계정을 따로 운영한다.
- www.sandbox.paypal.com : 개발 테스트를 위한 계정으로 사용하며, 일반 페이팔 계정에서 인식되지 않음
- www.paypal.com : 일반 페이팔 계정으로 실제 거래가 가능함
- 만일 페이팔 일반계정에서 개발자 아이디를 생성한 뒤에 sandbox(위의 예제) 결제를 진행하려고 한다면, 정상적으로 페이팔에 접속되지 않는다. 개발 테스트를 진행하려면 반드시 'www.sandbox.paypal.com'에서 계정을 생성한 뒤에 해당 계정으로 접속해야만 가상 거래를 테스트할 수 있다.

- 가상결제가 정상적으로 진행된다면, 아래와 같은 카드승인 결과를 확인할 수 있다.

3 주문결과 페이지
1) OrdeRouter.js 추가
- 주문결과를 확인할 수 있는 '/mine' 라우터를 생성한다. 라우터의 순서는 아래와 같이 가장 위쪽에 지정한다.
(**라우터 순서 중요)
|
import express from 'express';
import expressAsyncHandler from 'express-async-handler';
import { isAuth } from '../utils';
import Order from '../models/orderModel';
const orderRouter = express.Router();
// <-- 추가
orderRouter.get(
'/mine',
isAuth,
expressAsyncHandler( async(req, res) => {
const orders = await Order.find({ user: req.user._id });
res.send( orders );
})
)
// 추가-->
orderRouter.get('/:id', isAuth, expressAsyncHandler( async(req, res) => {
const order = await Order.findById(req.params.id);
// 중략...
|
[ root\backend\routers\orderRouter.js ]
2) api.js 추가
- 'localhost:5000\api\orders\mine'에 접속했을 때, 사용자의 데이터를 받아올 수 있는 axios를 구현한다.
|
// <-- 추가 export const getMyOrders = async() => { try{
const { token } = getUserInfo();
const response = await axios({
url: `${apiUrl}/api/orders/mine`,
headers: {
'Content-Type': 'application/json',
Authorization: `Bearer ${ token }`,
},
});
if(response.statusText !== 'OK'){
throw new Error(response.data.message);
}
return response.data;
}catch(err){
return {error: err.response ? err.response.data.message : err.message }
}
};
// 추가--> export const getPaypalClientId = async() => {
const response = await axios({
// 중략... |
[ root\frontend\src\api.js ]
3) ProfileScreen.js 수정
- 유저 프로필 페이지의 랜더링 부분을 수정한다.
|
import { getMyOrders, update } from '../api'; // getMyOrders 추가 import { getUserInfo, setUserInfo, clearUser } from '../localStorage';
import { showLoading, hideLoading, showMessage } from '../utils';
const ProfileScreen = {
after_render: () => {
// 중략...
},
render: async() => { // async 추가
const { name, email } = getUserInfo();
// <-- 추가 & 수정 if(!name){
document.location.hash = '/';
}
const orders = await getMyOrders();
return ` <div class="content profile">
<div class="profile-info">
<div class="form-container">
<form id="profile-form">
<ul class="form-items">
<li>
<h1>User Profile</h1>
</li>
<li>
<label for="name">Name</label>
<input type="name" name="name" id="name" value="${name}"/>
</li>
<li>
<label for="email"> Email</label>
<input type="email" name="email" id="email" value="${email}"/>
</li>
<li>
<label for="password">Password</label>
<input type="password" name="password" id="password"/>
</li>
<li>
<button type="submit" class="primary">Update</button>
</li>
<li>
<button type="button" id="signout-button">Sign Out</button>
</li>
</ul>
</form>
</div>
</div>
<div class="profile-orders">
<h2>주문 내역</h2>
<table>
<thead>
<tr>
<th>주문 ID</th>
<th>주문날짜</th>
<th>총계</th>
<th>승인</th>
<th>배송상황</th>
<th>주문결과</th>
</tr>
</thead>
<tbody>
${
orders.length === 0
? `<tr><td colspan="6"> 주문내역 없음 </td></tr>`
: orders.map(
(order) => `
<tr>
<td>${order._id}</td>
<td>${order.createdAt}</td>
<td>${order.totalPrice}</td>
<td>${order.paidAt || 'No' }</td>
<td>${order.deliveryAt || 'No'}</td>
<td><a href="/#/order/${order._id}"> 상세 내역</a></td>
</tr>
`
).join('\n')
}
</tbody>
</table>
</div>
</div>
`;
},
};
// 추가 & 수정 -->
export default ProfileScreen;
|
[ root\frontend\src\screens\ProfileScreen.js ]
4) style.css 추가
- 프로필 스타일을 추가한다.
|
/* Profile */ .profile{
display:flex;
flex-wrap: wrap;
align-items: flex-start;
}
.profile-info{
flex: 1 1 20rem;
}
.profile-orders{
flex: 3 1 60rem;
margin-left: 1rem;
}
table{
width: 100%;
}
th{
text-align: left;
}
tbody > tr:nth-child(odd){
background-color:#f0f0f0;
}
td{
padding: 0.5rem;
}
|
[ root\frontend\src\style.css ]
5) 주문 결과
- 프로필을 클릭했을 때, 아래와 같은 주문내역을 확인할 수 있다. 세부적인 UI와 숨겨야하는 부분은 좀더 손봐야 하겠지만 쇼핑몰의 전반적인 구조는 '라우터 생성 - 서버&프론트 api - 랜더링 페이지 - css' 과정의 반복이다. 미들웨어와 컴포넌트 그리고 디자인을 어떻게 응용하느냐에 따라 그 결과가 다를 뿐 내부구조는 비슷하다.

'웹개발 자료실 > No프레임워크 쇼핑몰제작Code' 카테고리의 다른 글
| E-commerce Vanila JS [11편] 결제단계 (0) | 2021.12.13 |
|---|---|
| E-commerce Vanila JS [10편] 회원가입 | 인증 | 로그아웃 (0) | 2021.12.11 |
| E-commerce Vanila JS [9편] 로그인 인증(2) (0) | 2021.12.10 |
| E-commerce Vanila JS [8편] 로그인 인증(1) (0) | 2021.12.10 |
| E-commerce Vanila JS [7편] 몽고DB 연결 (0) | 2021.12.09 |
댓글